Apple Galette
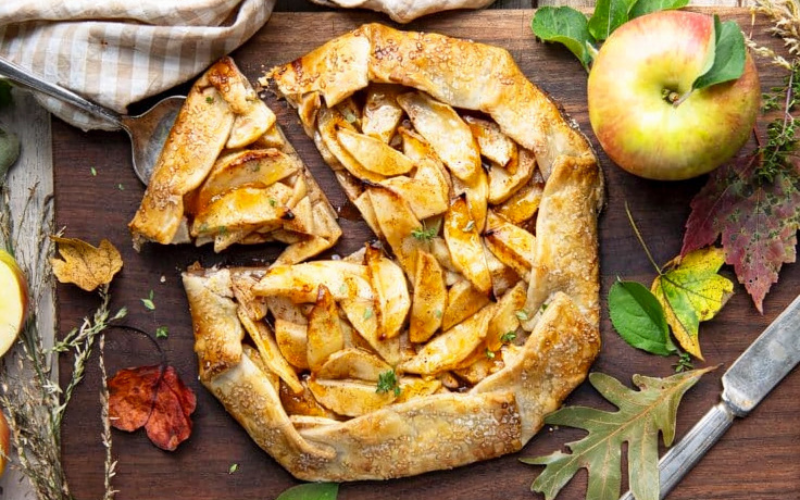
Craving a simple yet elegant dessert that feels bakery-made but is incredibly easy at home? I absolutely love making this Apple Galette, a rustic French apple tart that’s bursting with warm cinnamon flavor and wrapped in a flaky, golden crust. Unlike traditional pies, a galette is free-form, forgiving, and perfect when I want an impressive dessert without the fuss.
This apple galette recipe uses a refrigerated pie crust, making it ideal for busy days or beginner bakers. Juicy apple slices are tossed with sugar, lemon juice, cinnamon, and nutmeg, then baked until tender and caramelized. Finished with a glossy apricot jam glaze and a sprinkle of coarse sugar, this dessert tastes incredible on its own—or even better with vanilla ice cream or whipped cream.
Whether you’re baking for a cozy fall evening, a holiday gathering, or just to satisfy an apple craving, this homemade apple galette never disappoints.
Ingredients List
Apple Galette Ingredients
Here’s everything I use to make my easy apple galette:
1 refrigerated pie crust dough (half of a 14.1-ounce package, I prefer Pillsbury)
1½ to 2 lbs apples, peeled, cored, and sliced into ¼-inch pieces
(I use 4 medium Granny Smith or Honeycrisp apples)½ cup granulated sugar
2 teaspoons fresh lemon juice
1 teaspoon ground cinnamon
½ teaspoon ground nutmeg
¼ teaspoon salt
1 tablespoon cornstarch
1 large egg, lightly beaten
Coarse sugar (or extra granulated sugar), for sprinkling
¼ cup apricot jam
For Serving (Optional)
Vanilla ice cream
Fresh whipped cream
These simple ingredients come together to create a beautifully rustic apple dessert with bold flavor and flaky texture.
When I make this apple galette, I keep things simple. You don’t need any fancy equipment, which is one of the reasons I love this recipe so much. Having these basic tools ready makes the process smooth and stress-free.
Baking Sheet: I use a large baking sheet lined with parchment paper to prevent sticking and ensure even baking.
Parchment Paper: This helps the galette bake evenly and makes cleanup incredibly easy.
Mixing Bowl: A medium-sized bowl works perfectly for tossing the apple slices with sugar and spices.
Sharp Knife and Cutting Board: Essential for peeling, coring, and slicing the apples evenly.
Pastry Brush: I use this to brush the egg wash onto the crust for a beautiful golden finish.
Measuring Cups and Spoons: Accurate measurements help balance the sweetness and spice.
Small Saucepan (Optional): Useful for warming the apricot jam before brushing it over the baked galette.
With these tools on hand, assembling the apple galette becomes quick and enjoyable, even for first-time bakers.

Preparing the Apple Filling
The filling is where all the flavor comes together in this apple galette recipe. I like to prepare it first so the apples are evenly coated and ready to go once the crust is rolled out.
Mixing the Apple Filling
In a large mixing bowl, I combine the sliced apples with granulated sugar, fresh lemon juice, ground cinnamon, nutmeg, salt, and cornstarch. I gently toss everything together until the apples are evenly coated. The cornstarch helps thicken the juices as the galette bakes, preventing a soggy crust while keeping the apples tender and juicy.
Once mixed, I let the apple filling sit for about 5–10 minutes. This allows the flavors to meld and draws out a bit of the natural apple juice, which creates that delicious caramelized filling during baking.
This is my favorite part of the process because the apple galette doesn’t have to look perfect. Its rustic shape is exactly what makes it so charming.
Rolling and Filling the Crust
I start by preheating my oven to 400°F (200°C). Then, I place the refrigerated pie crust dough onto a piece of parchment paper and gently roll it into a rough 12-inch circle. The edges don’t need to be even—that’s part of the galette’s beauty.
Next, I arrange the apple slices in the center of the crust, leaving about a 2-inch border all the way around. I like to layer the apples in a circular pattern, slightly overlapping them, which helps the galette bake evenly and look beautiful once finished. I make sure not to pour in excess liquid from the bowl to keep the crust crisp.
Folding and Sealing the Edges
Once the apples are arranged, I carefully fold the edges of the crust up and over the filling, pleating as I go. The center remains open, showing off the apples. I gently press the folds so they hold their shape during baking.
After shaping, I brush the exposed crust with the lightly beaten egg. This step gives the apple galette that gorgeous golden-brown color. Finally, I sprinkle coarse sugar over the crust for added crunch and sparkle.
Baking the Galette
I transfer the parchment paper and galette directly onto a baking sheet and bake it in the preheated oven for 40–45 minutes, or until the crust is golden and the apples are soft and bubbling. If the crust starts browning too quickly, I loosely tent it with foil during the last few minutes of baking.
Once the apple galette comes out of the oven, I like to add a simple glaze that takes both flavor and presentation to the next level.
Apricot Jam Glaze
While the galette is still warm, I gently heat the apricot jam in a small saucepan until it becomes smooth and easy to brush. Using a pastry brush, I lightly coat the exposed apples with the warm jam. This gives the apple galette a beautiful shine and adds a subtle sweetness that complements the spiced apples perfectly.
Serving Suggestions
I usually let the apple galette cool for about 10–15 minutes before slicing. It’s delicious served warm on its own, but I love pairing it with a scoop of vanilla ice cream or a dollop of freshly whipped cream. The contrast between the warm, spiced apples and the cold, creamy topping is absolutely irresistible.
This rustic apple dessert is perfect for fall gatherings, holidays, or even a casual weeknight treat.
Storage Instructions
How to Store Apple Galette
If I have leftovers, I store the apple galette loosely covered at room temperature for up to 1 day. For longer storage, I refrigerate it in an airtight container, where it stays fresh for up to 3 days.
Reheating and Freezing Tips
To reheat, I warm slices in a 350°F (175°C) oven for about 10 minutes to help restore the crispness of the crust. The apple galette can also be frozen for up to 1 month. I wrap it tightly in plastic wrap and foil, then thaw it overnight in the refrigerator before reheating.
Conclusion
This easy Apple Galette recipe is one of my go-to desserts when I want something comforting, elegant, and effortless. With its flaky crust, tender spiced apples, and glossy apricot finish, it delivers bakery-style results using simple ingredients and minimal prep.
What I love most about this rustic French apple tart is its flexibility—no perfection required, just great flavor. Whether you serve it plain or with ice cream, this apple galette is guaranteed to impress. If you’re looking for an easy apple dessert that tastes homemade and looks stunning, this recipe is one you’ll come back to again and again.