Cookie Monster Cookies
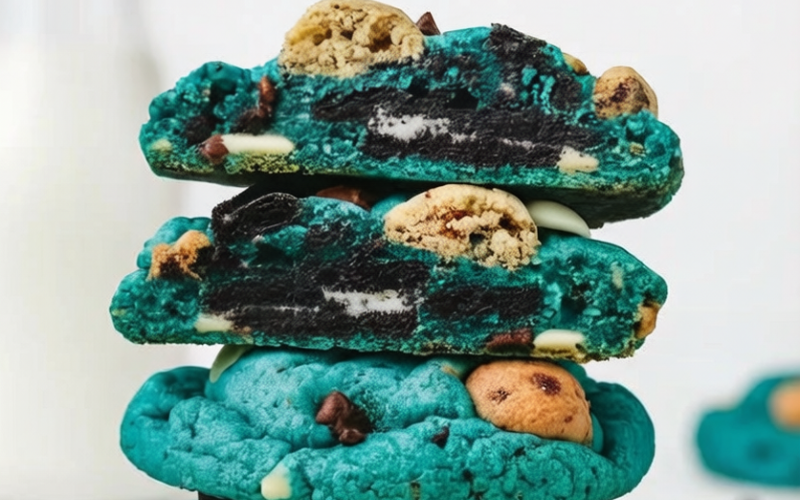
Craving a cookie that’s fun, colorful, and packed with chocolatey goodness? Say hello to my Cookie Monster Cookies! Inspired by everyone’s favorite blue Muppet, these cookies are soft, chewy, and absolutely loaded with chocolate chips, mini cookies, and Oreos. The secret is in the vibrant blue dough that makes them as Instagram-worthy as they are delicious. Whether you’re baking for kids, a party, or just because, these cookies will steal the show.
Ingredients List
Here’s everything you’ll need to whip up a batch of these fun and indulgent cookies:
Cookie Dough Ingredients
⅔ cup (140 g) butter, softened (regular or vegan)
½ cup (100 g) granulated sugar
½ cup (100 g) light brown sugar
1 large egg
1 Tablespoon vanilla extract
¼–½ teaspoon blue food coloring
2 cups + 2 Tablespoons (265 g) all-purpose flour (see notes)
¾ teaspoon salt
¾ teaspoon baking soda
¼–½ cup chocolate chips (a mix of semi-sweet and white chocolate, regular or vegan)
⅓ cup mini chocolate chip cookies (like Chips Ahoy or Enjoy Life mini cookies, see notes)
14 Oreo cookies
Required Kitchen Tools
Baking these Cookie Monster Cookies is easy, but having the right tools makes it even more fun:
Mixing Bowl & Hand/Stand Mixer – For creaming the butter and sugar and mixing in the dough evenly.
Measuring Cups & Spoons – Accurate measurements are key to perfect cookies every time.
Spatula & Wooden Spoon – To fold in cookies, chocolate chips, and Oreos without breaking them.
Baking Sheet & Parchment Paper – Prevents sticking and ensures even baking.
Cooling Rack – Essential for cooling cookies without losing their chewy texture.
Having these tools ready will make the cookie-baking process smooth and enjoyable.
Dough Preparation
Making the dough for my Cookie Monster Cookies is where the magic begins. This step ensures your cookies are soft, chewy, and packed with blue cookie goodness. Follow these steps carefully, and you’ll get that signature Cookie Monster look and texture.
Creaming Butter and Sugars
First, I start by beating the softened butter with both the granulated sugar and light brown sugar. I use a hand mixer, but a stand mixer works perfectly too. Cream the mixture on medium speed until it’s light, fluffy, and pale in color—usually about 2–3 minutes. This step is key to getting soft, melt-in-your-mouth cookies.
Adding Wet Ingredients
Next, I add the egg and vanilla extract to the creamed butter and sugar. I mix until everything is fully combined, then add the blue food coloring. I usually start with ¼ teaspoon and add more until I get that vibrant Cookie Monster blue. The color can be as bold or as playful as you like!
Mixing Dry Ingredients
In a separate bowl, I whisk together the flour, salt, and baking soda. This ensures the baking soda is evenly distributed, preventing any uneven rising or salty pockets in the cookies.
Combining Wet and Dry Ingredients
I gradually add the dry ingredients to the wet mixture, mixing on low speed until a soft cookie dough forms. The dough should be slightly sticky but easy to scoop. Overmixing at this stage can make the cookies tough, so gentle folding is perfect.
Adding the Mix-Ins
Finally, I fold in the chocolate chips, mini chocolate chip cookies, and roughly chopped Oreos. I try not to overmix so that each cookie gets a nice distribution of chocolatey and crunchy bits. The dough now looks like a little blue cookie monster waiting to come to life in the oven!
Shaping the Cookie Monster Cookies
Shaping these cookies is where you start to see the Cookie Monster magic come alive. I like to make them generous in size so they stay soft and chewy in the middle with slightly crisp edges.

Scooping the Dough
I use a cookie scoop or a tablespoon to portion out the dough. Each scoop should be about 2–3 tablespoons of dough. I roll them lightly into balls, keeping them slightly rough to give that homemade, rustic look.
Adding Extra Crunch
Once the dough balls are ready, I press a few extra mini chocolate chips or cookie pieces on top of each one. This gives the cookies a fun, textured look and makes sure each bite has chocolate in every corner.
Baking the Cookies
I preheat my oven to 350°F (175°C) and line a baking sheet with parchment paper. I place the dough balls about 2 inches apart to allow for spreading.
Baking Tips
Bake for 10–12 minutes, or until the edges are lightly golden.
The centers will look slightly underbaked, but that’s perfect for that chewy Cookie Monster texture.
Remove the cookies from the oven and let them cool on the baking sheet for 5 minutes before transferring them to a cooling rack. This helps them set without losing softness.
Cookie Monster Fun
For extra fun, I sometimes add mini cookie “eyes” made from white chocolate chips with a dot of melted chocolate in the center. It gives the cookies a whimsical, character-inspired look that kids and adults adore. You can even mix in more Oreos or mini cookies to make each cookie unique.
The result? Soft, chewy, bright blue cookies loaded with chocolate, cookie chunks, and pure fun—exactly like the Cookie Monster would want!
Serving and Decoration
Serving these Cookie Monster Cookies is just as fun as baking them! I love arranging them on a colorful platter for parties, school events, or even just for a weekend treat.
Fun Serving Ideas
With Milk: Nothing pairs better with a chewy, chocolate-studded cookie than a cold glass of milk.
Cookie Sandwiches: Slice a few cookies in half and sandwich some frosting or ice cream for a decadent treat.
Character Faces: Add extra mini cookies, candy eyes, or chocolate chips on top to make playful Cookie Monster faces.
These cookies are not just a dessert—they’re an experience. Bright, fun, and irresistible, they make any occasion feel special.
Storage Instructions
Keeping your cookies fresh is easy, so you can enjoy them over several days.
At Room Temperature
Store the cookies in an airtight container for up to 4–5 days. They stay soft, chewy, and perfectly blue, ready for snacking anytime.
Freezing
I like to freeze any leftover cookie dough or baked cookies for longer enjoyment:
Cookie Dough: Scoop the dough balls onto a baking sheet, freeze until solid, then transfer to a freezer-safe bag for up to 3 months. Bake straight from frozen, adding 1–2 minutes to the baking time.
Baked Cookies: Layer baked cookies with parchment paper in a freezer-safe container. They can be stored for up to 1 month. Thaw at room temperature before enjoying.
Tips for Perfect Cookie Monster Cookies
Don’t overmix the dough once the flour is added; this keeps the cookies soft.
Adjust blue food coloring gradually to get your desired shade.
Use a mix of chocolate chips and mini cookies to maximize texture and flavor.
Slightly underbaking is the key to that soft, chewy center.
Conclusion
Baking Cookie Monster Cookies is pure joy. From the vibrant blue dough to the melty chocolate chips and crunchy cookie bits, every bite is a playful, delicious experience. With these easy steps, fun mix-ins, and simple decorating ideas, you can create cookies that are as impressive as they are irresistible. Whether for a special occasion or just because, these cookies bring smiles, nostalgia, and plenty of chocolatey happiness to everyone who tries them.