Easy Patriotic Ice Cream Sandwich Cake
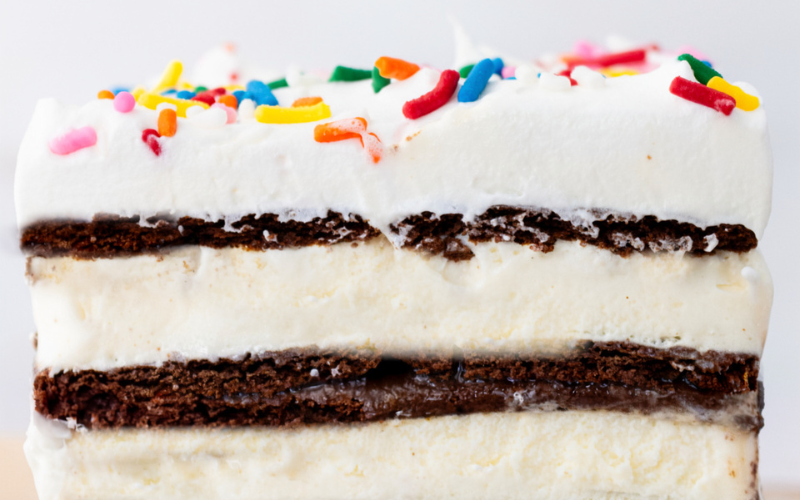
Craving a show-stopping, no-bake dessert that’s perfect for summer celebrations? Let me introduce you to my Easy Patriotic Ice Cream Sandwich Cake. This vibrant, layered dessert is a crowd-pleaser, combining creamy ice cream, fluffy whipped topping, and indulgent chocolate and caramel sauces. It’s simple to assemble, visually stunning, and guaranteed to wow friends and family at barbecues, Fourth of July parties, or any festive gathering.
Ingredients List
Cake Ingredients
24 vanilla ice cream sandwiches, unwrapped
2 (8-ounce) containers whipped topping (such as Cool Whip®), thawed
1 (12-ounce) jar hot fudge ice cream topping, warmed
1 (12-ounce) jar caramel ice cream topping
¼ cup chopped pecans, or to taste
Required Kitchen Tools
Having the right tools makes assembling this ice cream sandwich cake a breeze. Here’s what I used:
9x13-inch Baking Dish: Perfect for layering the ice cream sandwiches and toppings evenly.
Spatula or Offset Spatula: Essential for spreading whipped topping smoothly between layers.
Microwave or Small Saucepan: To gently warm the hot fudge and caramel sauces for easy pouring.
Knife: To cut and serve neat slices of the ice cream sandwich cake.
With these tools on hand, you’re ready to create a flawless, patriotic dessert that’s as fun to make as it is to eat.
Preparing the Cake Base
To start, I line my 9x13-inch baking dish with parchment paper for easy cleanup. Then, I place a layer of vanilla ice cream sandwiches side by side, covering the bottom completely. This forms a sturdy base for all the creamy layers to come.
Adding the Whipped Topping
Next, I spread half of the thawed whipped topping evenly over the ice cream sandwiches. The whipped topping acts like a smooth, fluffy layer that keeps the ice cream sandwiches from sticking together while adding extra creaminess. I make sure to cover every corner and gently smooth the edges for a polished look.
Drizzling the Sauces
Now comes the fun part: the chocolate and caramel drizzle! I warm the hot fudge and caramel toppings slightly in the microwave to make them pourable. Then, I drizzle the hot fudge over half of the whipped topping layer, followed by a generous drizzle of caramel over the other half. For added texture, I sprinkle ¼ cup of chopped pecans evenly on top. This not only adds crunch but also a delightful nutty flavor that complements the creamy ice cream.
Adding the Second Layer
Once the sauces are in place, I carefully add a second layer of ice cream sandwiches, arranging them neatly. I repeat the whipped topping, sauce, and pecan steps to create a beautiful, layered effect. This second layer is where the “wow” factor really shines, giving the cake a visually striking, festive appearance.
Freezing the Cake
To ensure my ice cream sandwich cake holds its shape, I cover it tightly with plastic wrap and freeze for at least 4 hours, or overnight if possible. Freezing solidifies the layers, making it easy to slice cleanly while keeping the ice cream from melting.
Serving and Decoration
When it’s time to serve, I remove the cake from the freezer and let it sit for 5-10 minutes to slightly soften for easier slicing. Using a sharp knife, I cut into neat squares or rectangles. For a final patriotic touch, I sometimes add fresh berries on top, like strawberries and blueberries, to create a red, white, and blue presentation.
Suggested Toppings
Extra Hot Fudge or Caramel: For those who love indulgence, an extra drizzle makes it even more decadent.
Chopped Nuts: Pecans, walnuts, or almonds add crunch and a nutty aroma.
Fresh Fruit: Strawberries, blueberries, or raspberries elevate the visual appeal and flavor.
Storage Instructions
Keeping the Cake Fresh
After serving, any leftovers should be stored in the freezer, tightly covered with plastic wrap or in an airtight container. This keeps the ice cream firm and prevents freezer burn. My cake stays delicious for up to 1 week when stored properly.
Conclusion
Making this Easy Patriotic Ice Cream Sandwich Cake is one of my favorite ways to celebrate summer holidays. With layers of ice cream, whipped topping, and indulgent chocolate and caramel sauces, it’s as delicious as it is eye-catching. The best part? No baking required, so I can spend more time enjoying the party rather than being stuck in the kitchen. Whether you’re serving it at a family gathering, a barbecue, or a festive picnic, this dessert always steals the show and keeps everyone asking for seconds.