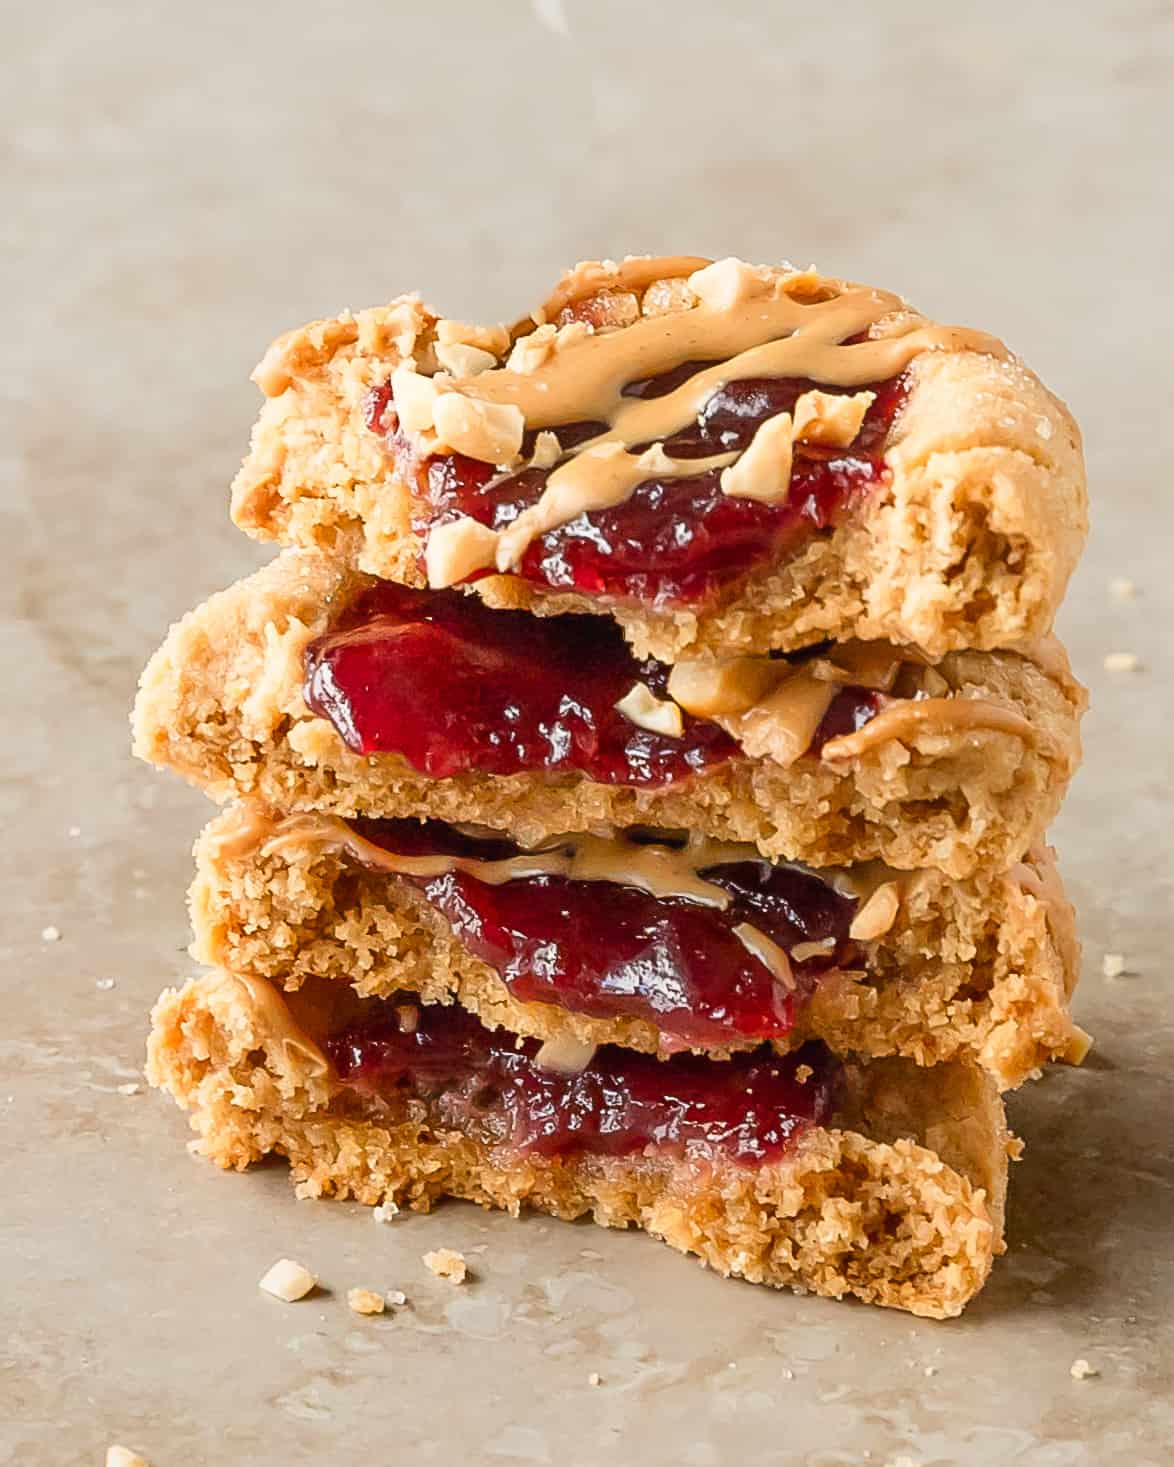
Craving a nostalgic treat with a gourmet twist? Dive into the world of Peanut Butter and Jelly Cookies, a delightful American classic that’s sure to satisfy your sweet tooth.
These irresistible cookies boast a soft, chewy peanut butter base with a delicious jammy center that takes you right back to childhood.
Ingredients List
Creating perfect Peanut Butter and Jelly Cookies requires a few key components to achieve the ideal balance of flavors and textures. Let’s break down the ingredients needed for each element of these delicious cookies.
Cookie Ingredients
- 1¼ cups (6¼ oz/177 g) all-purpose flour
- ¾ teaspoon baking soda
- ½ teaspoon baking powder
- ¼ teaspoon salt
- 1 cup (8 oz/225 g) smooth peanut butter
- ½ cup (4 oz/115 g) unsalted butter, softened
- ¾ cup (6 oz/170 g) granulated sugar
- ½ cup (3 oz/85 g) dark brown sugar
- 1 large egg, at room temperature
- 1 tablespoon whole milk
- 1 teaspoon pure vanilla extract
- ⅔ cup (3½ oz/94 g) salted and roasted peanuts, chopped
- ½ cup (5 oz/142 g) seedless raspberry jam (or your preferred flavor)
Required Kitchen Tools
When preparing Peanut Butter and Jelly Cookies, having the right kitchen tools can make the process smoother and more enjoyable. Here are the essential tools you will need:
- Stand or Hand Mixer: To efficiently cream the butter, peanut butter, and sugars, a stand mixer or hand mixer can save you time and effort.
- Mixing Bowls: A set of mixing bowls in various sizes for combining dry and wet ingredients separately.
- Measuring Cups and Spoons: Precise measurements are crucial for baking success, so having a complete set of measuring tools is essential.
- Cookie Scoop or Tablespoon: For consistent cookie sizing, a cookie scoop or tablespoon measure helps create uniform cookies that bake evenly.
- Baking Sheets: Two baking sheets lined with parchment paper to prepare and bake the cookies in batches.
- Cooling Rack: To allow the cookies to cool properly after baking, preventing them from becoming soggy on the bottom.
Having these tools on hand will set you up for a successful cookie-baking experience.
Dough Preparation
Preparing the dough for Peanut Butter and Jelly Cookies is a crucial step in achieving the perfect texture and flavor for these delightful treats. Follow the steps below to mix the ingredients and create the perfect cookie dough.
Mixing the Ingredients
To start the dough preparation, combine the dry ingredients—flour, baking soda, baking powder, and salt—in a small bowl and whisk together until well combined. Set this mixture aside while you prepare the wet ingredients.
In a large mixing bowl, cream the butter and peanut butter together until soft and well combined, about 1 minute. This initial creaming helps to create a smooth base for your cookie dough. Next, add both the granulated sugar and dark brown sugar to the peanut butter mixture. Beat until light and fluffy, approximately 2 minutes. The mixture should appear lighter in color and texture.
Add the room temperature egg, milk, and vanilla extract to the creamed mixture and mix well until completely combined and smooth. Scrape down the sides of the bowl with a rubber spatula to ensure all ingredients are incorporated evenly.
Finally, gently fold in the dry ingredient mixture and chopped peanuts until just combined. Be careful not to overmix at this stage, as it can lead to tough cookies. The dough should be thick, slightly sticky, and dotted with the chopped peanuts throughout.
Chilling the Dough (Optional)
While this recipe doesn’t strictly require chilling the dough before baking, allowing the dough to rest in the refrigerator for 30 minutes can enhance the flavor development and make the dough easier to handle, especially on warm days. If you choose to chill the dough, cover the bowl with plastic wrap and refrigerate. When ready to bake, let the dough sit at room temperature for about 10 minutes to soften slightly for easier scooping.
Shaping the Cookies
To shape the Peanut Butter and Jelly Cookies, follow these steps for that perfect thumbprint cookie with a jammy center:
- Preheat the Oven:
Preheat your oven to 325°F (165°C) with fan assist. Line 2 baking sheets with parchment paper and set aside. - Portion and Roll Dough:
Scoop out a heaped tablespoon of dough for each cookie. Roll each portion between your palms to form a smooth ball. - Flatten into Discs:
Gently flatten each ball into a 2-inch (5 cm) disc. Arrange the discs on the prepared baking sheets, placing them about 3 inches (7½ cm) apart to allow for spreading during baking. - Create Indentation:
Using your thumb or the back of a ½ teaspoon measuring spoon, press into the center of each cookie disc to create a well for the jam. Be careful not to press all the way through to the baking sheet. - Add Initial Jam Filling:
Spoon approximately ½ teaspoon of raspberry jam (or your preferred flavor) into each indentation. The jam will spread slightly during baking, so avoid overfilling at this stage.
Baking the Cookies
Baking the Peanut Butter and Jelly Cookies to golden perfection is a crucial step in the recipe. Proper baking temperature and timing ensures that the cookies develop the ideal texture—soft and chewy in the center with slightly crisp edges.
Baking Temperature and Time
For perfectly baked Peanut Butter and Jelly Cookies, maintain an oven temperature of 325°F (165°C) with fan assist. This moderate temperature allows the cookies to bake evenly without over-browning the edges before the centers are done.
Place the prepared cookie sheets in the preheated oven and bake for 20-22 minutes. The cookies are done when they are set and the edges are just beginning to brown. The centers may still look slightly soft, but they will firm up as the cookies cool.
Rotate the baking sheets halfway through the baking time to ensure even browning. If baking multiple batches, allow the baking sheets to cool completely between batches or use additional sheets.
Adding the Final Filling
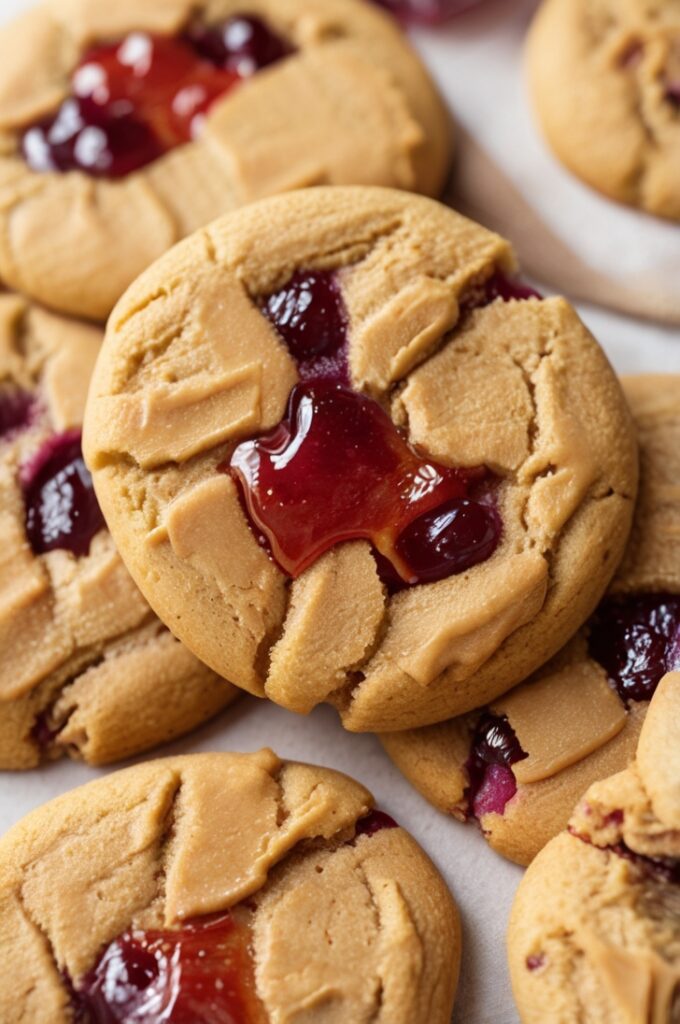
The two-stage filling process is what makes these Peanut Butter and Jelly Cookies special. The initial jam added before baking creates a base filling that bakes into the cookie, while the additional jam added after baking provides a fresh, vibrant flavor and appearance.
Techniques for Filling the Cookies
As soon as the cookies come out of the oven and while they’re still hot, add the second layer of jam. The residual heat will help the jam settle into the indentation without fully melting it:
- Add More Jam:
While the cookies are still hot, spoon an additional ½ teaspoon of jam onto the center of each cookie, gently adding it to the existing jam indentation. - Allow to Set:
The heat from the freshly baked cookies will slightly melt the new jam, helping it to settle into the indentation. This creates a beautiful, glossy jam center that remains vibrant in color and flavor. - Cool Completely:
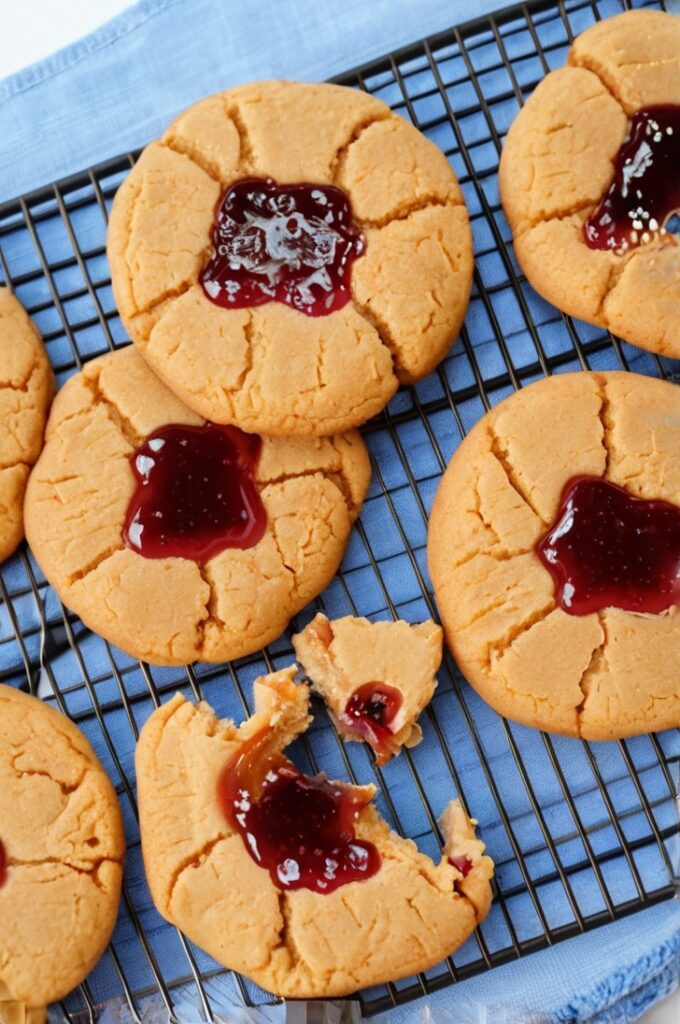
Allow the cookies to cool on the baking sheets for 5 minutes before transferring to a wire cooling rack to cool completely. The jam centers will continue to set as the cookies cool.
Serving and Decoration
When it comes to serving and presenting your Peanut Butter and Jelly Cookies, attention to detail can elevate these nostalgic treats into an impressive offering for guests or a special treat for yourself. Here are some tips to ensure your cookies look as good as they taste:

Suggested Toppings and Variations
While the classic Peanut Butter and Jelly Cookie is delicious on its own, there are various ways to customize and decorate these treats for different occasions:
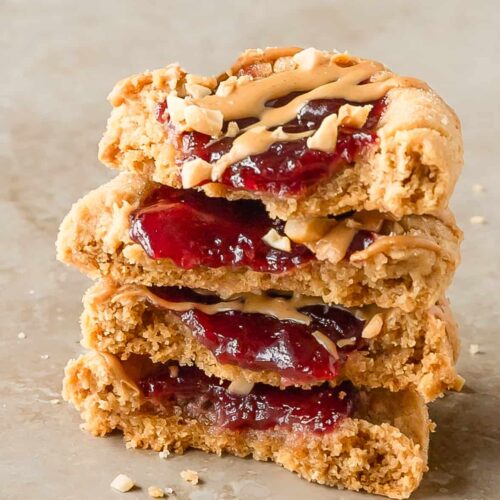
- Chopped Peanuts: Sprinkle additional finely chopped roasted peanuts around the jam center for extra crunch and visual appeal.
- Drizzled Peanut Butter: Warm some additional peanut butter until fluid and drizzle over the cooled cookies for an elevated presentation.
- Jam Variations: Experiment with different jam flavors such as strawberry, grape, apricot, or blackberry to create unique flavor combinations.
- Peanut Butter Variations: Try using crunchy peanut butter instead of smooth for a different texture, or experiment with other nut butters like almond or cashew.
- Chocolate Addition: Drizzle melted chocolate over the cooled cookies or add mini chocolate chips to the dough for a chocolate PB&J experience.
These simple decoration ideas can transform your homemade cookies into bakery-worthy treats perfect for special occasions or everyday indulgence.
Storage Instructions
Proper storage is key to maintaining the freshness and texture of your Peanut Butter and Jelly Cookies. Here’s how to keep them at their best for as long as possible.
How to Keep Peanut Butter and Jelly Cookies Fresh
After preparing your delicious Peanut Butter and Jelly Cookies, store them in an airtight container at room temperature for up to 2 days. These cookies are soft and a little sticky due to the jam centers, so place sheets of parchment paper between layers if you need to stack them to prevent them from sticking together.
For best results, keep the container away from direct sunlight and heat sources that could cause the jam to become too runny.
Freezing Peanut Butter and Jelly Cookies
If you want to enjoy your cookies over a longer period, freezing is an excellent option:
- Fully Cool: Ensure cookies are completely cooled before freezing.
- Layer with Parchment: Place cookies in a single layer with parchment paper between each layer.
- Freezer Container: Use a freezer-safe airtight container or freezer bag, removing as much air as possible before sealing.
- Freezing Duration: Frozen cookies will maintain quality for up to 3 months.
- Thawing: To enjoy, thaw cookies at room temperature for about 1-2 hours until soft.
For best results, consider freezing the cookie base without the final jam topping, then adding fresh jam after thawing.
Peanut Butter and Jelly Cookies
Ingredients
- 1¼ cups (6¼ oz/177 g) all-purpose flour
- ¾ teaspoon baking soda
- ½ teaspoon baking powder
- ¼ teaspoon salt
- 1 cup (8 oz/225 g) smooth peanut butter
- ½ cup (4 oz/115 g) unsalted butter, softened
- ¾ cup (6 oz/170 g) granulated sugar
- ½ cup (3 oz/85 g) dark brown sugar
- 1 large egg, at room temperature
- 1 tablespoon whole milk
- 1 teaspoon pure vanilla extract
- ⅔ cup (3½ oz/94 g) salted and roasted peanuts, chopped
- ½ cup (5 oz/142 g) seedless raspberry jam (or your preferred flavor)
Instructions
Stand or Hand Mixer
- To efficiently cream the butter, peanut butter, and sugars, a stand mixer or hand mixer can save you time and effort.
Mixing Bowls
- A set of mixing bowls in various sizes for combining dry and wet ingredients separately.
Measuring Cups and Spoons
- Precise measurements are crucial for baking success, so having a complete set of measuring tools is essential.
Cookie Scoop or Tablespoon
- For consistent cookie sizing, a cookie scoop or tablespoon measure helps create uniform cookies that bake evenly.
Baking Sheets
- Two baking sheets lined with parchment paper to prepare and bake the cookies in batches.
Cooling Rack
- To allow the cookies to cool properly after baking, preventing them from becoming soggy on the bottom.
Conclusion
Mastering Peanut Butter and Jelly Cookies opens up a world of delightful possibilities.
These cookies perfectly balance the rich, nutty flavor of peanut butter with the sweet, fruity brightness of jam—creating an irresistible treat that appeals to both children and adults alike.
By following the detailed instructions provided, you can easily recreate this nostalgic classic with a gourmet twist in your own kitchen.
The key to success lies in properly preparing the peanut butter dough, creating the perfect thumbprint indentation, and using the two-stage jam filling process for maximum flavor impact.